Showing posts with label dessert. Show all posts

Saturday, November 19, 2011

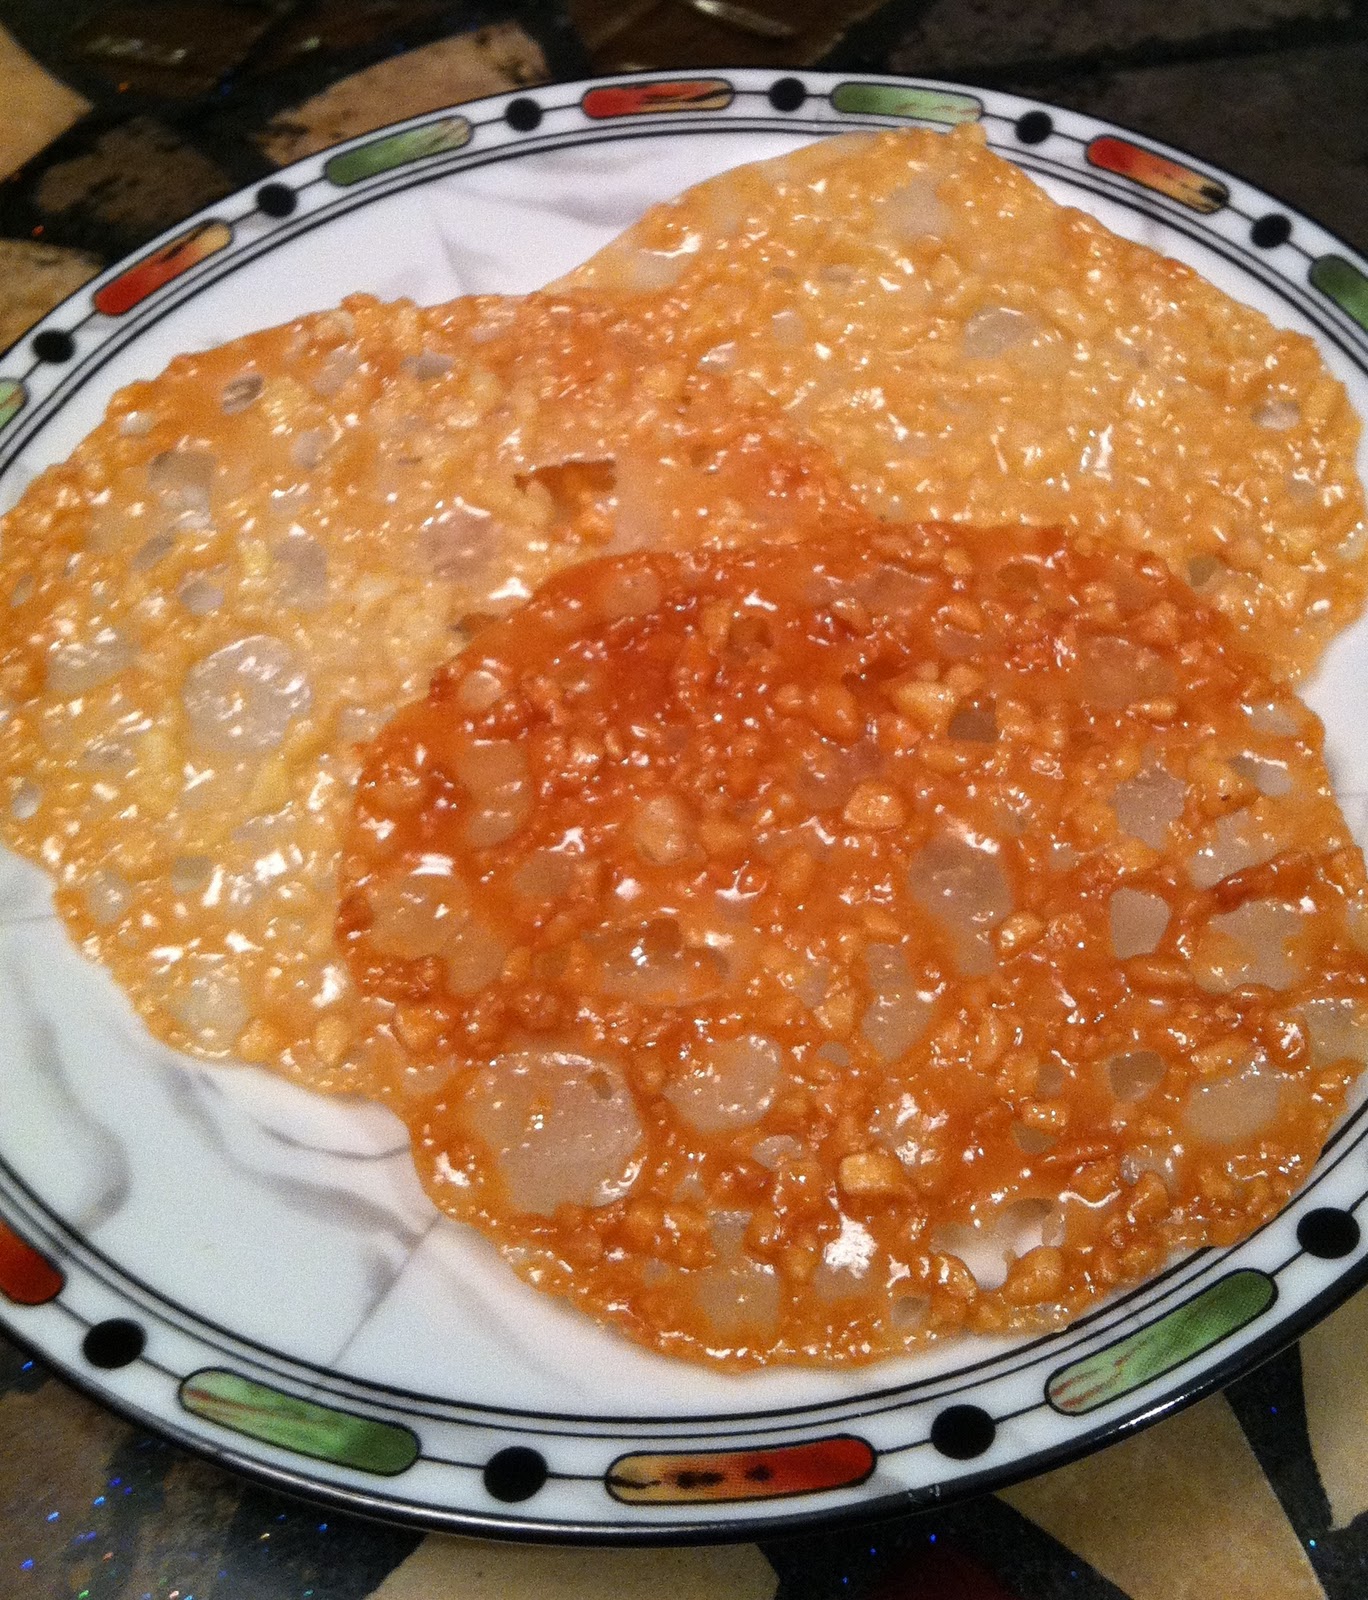
Vegan Lace Cookie Crisps


These were one of my favorite kinds of cookies...way back when.
But they were loaded with butter, other dairy, refined sugar...maybe even corn syrup and processed salt.

I was searching for a new cookie recipe to try out for a vegan cookie swap we have coming up and I thought... just maybe... I could recreate these.

OMG!! Success! You HAVE to try these. So easy and addicting.
I know it looks like a lot of directions but they are really simple.
I pieced this recipe together from several I found online.

Lace Florentine Cookies
Let me know what you think!

1 ¾ cup sliced almonds
3 tablespoons all-purpose flour
1 tablespoon finely grated orange zest
¼ teaspoon sea salt
¾ cups non-refined sugar
2 tablespoon non-dairy milk (we used unsweetened  coconut milk)
2 tablespoons brown rice syrup
5 tablespoons non-dairy “butter” (we used Earth Balance)
½ teaspoon pure vanilla extract

·         Pre-heat oven to 350 degrees.
·         Line 2 baking sheets with parchment paper
·         Pulse almonds in a small food processor until finely chopped, but not in a paste
·         In a bowl combine chopped almonds, flour, zest and salt
·         In a small sauce pan put milk, sugar, “butter” and the brown rice syrup. Bring to a boil stirring occasionally. Sugar should dissolve completely. Let the mixture boil for 1 minute.
·         Remove the mixture from heat and add vanilla
·         Pour the sugar mixture over the almond mixture and stir until well combined.
·         Set batter aside for 15-30 minutes to cool and thicken a bit
·         Using a ½ teaspoon, spoon tiny, rounded balls of dough onto the cookie sheet.
·         These spread! I suggest only cooking 6 balls of dough per large cookie sheet.
·         Place the cookie sheet in the center of the oven
·         I recommend cooking one sheet at a time
·         Bake for 4 minutes and (for even cooking) rotate the cookie sheet and bake for another 4 minutes
·         Remove from the oven when they are fully spread and a light golden brown
·         Put the second cookie sheet in the oven while the first sheet of cookies cools for a few minutes.
·         When you are able, transfer them to a wire cookie rack to cool completely.
·         Load up the (now empty) cookie sheet with six more balls of dough
·         I used the same parchment paper for the entire batch of dough
·         About that time the second batch should be done in the oven  and you can switch…
·         Keep alternating  until the batter is gone.
·         Store in an airtight container
Tips:
1.       Find the cooking time “sweet spot” for your oven…they are too sticky if not golden enough…and too brittle if too well done.
2.       You can drizzle melted chocolate over the cooled cookies if you like, we preferred them plain
3.       Try and eat just one!

Thursday, September 29, 2011

Vegan Chocolate Chipper Cookies


I LOVE chocolate chip cookies...I always have, but I don't eat pre-made, processed, conventional ones anymore because of some food allergies and personal ingredient choices. 
After experimenting with many cookie recipes over the last 8-9 years, I feel that this is the best at-home, veganized one so far.
I think that these really tatse like warm, yummy chocolate chip cookies and not like a bad, sad reproduction!
Let me know what you think...
Vegan Chocolate Chipper Cookies
½ cup vegan butter substitute, like Earth Balance
¾ cup organic sugar of choice
2-3 teaspoons of vanilla extract
3 (or more) tablespoons of water
2 cups whole grain flour
½ cup finely ground walnuts
2 teaspoons baking powder
½ teaspoon sea salt
¼ to ½ cup vegan chocolate chips
Preheat oven to 350
In a large bowl, blend the butter substitute, sugar, vanilla, and 2 tablespoons of water until well mixed.
Stir in the flour, ground walnuts, baking powder and salt. Keep stirring until it forms together like dough. If it is too dry and crumbly add more water one tablespoon at a time, just until a small piece of the dough will hold together when formed into a little ball.
Form small dough balls and press onto an ungreased cookie sheet. When pressed, cookies should be about ¼” thick.
Bake for about 15 minutes and check. They should hold together but be sure the bottoms are not burning. My batch took a bit longer and I checked them about every 2 minutes.
Let them cool on a wire rack and enjoy!

Wednesday, July 27, 2011

Sunbutter Bombs


These are SO good! Like healthy little brownie nuggets…no baking, super easy and all natural ingredients!

This recipe is all approximate! I do it by “feel” but this should give you somewhere to start. If it seems too dry add more liquidy stuff like dates, vanilla or agave…if it is too sticky add more dry stuff like ground nuts.

Play with it a bit until the little bombs hold together with out being oily, crumbly or loose.

Sunbutter Bombs


2 cups of nuts of your choice. I used pecans.
1 to 2 cups of pitted soft dates
3 to 4 teaspoons of vanilla
½ to 1 cup of sunflower seed butter
1 to 2 tablespoons of agave syrup
2 to 4 tablespoons cocoa (optional)

* grind the nuts finely in a small food processor or a high speed blender
* move the ground nuts to a separate bowl

For the next steps, start with the smaller amount of each additional ingredient that is listed above…
* Put the dates into the food processor or high speed blender and blend until chopped very small and sort of chewey
* Add the ground nuts to the chopped dates (if you want you can reserve a small amount of the ground nuts to dip the bombs in after they are rolled)
* Also add the vanilla and agave
* Add the cocoa if desired
* Blend all until it binds together…add dry or wet ingredients as needed
* Roll into small balls and dip in ground nuts if desired.
* Refrigerate until ready to enjoy!
…mmmm

Saturday, June 4, 2011

Sensational Smores - Gluten Free and Vegan

All I can say is yum!

While I can't really call these "healthy"...
they are certainly a much healthier version of traditional smores.
I promise you will never miss what's not in here.
These products can be found in most health/whole foods stores.
I melted the vegan chocolate chips on the crackers and then added a dollop of the Ricemellow.
Topped it with another cracker and instant Sssssmores!
Let me know what you think.

Friday, July 23, 2010

Food Art - Dessert Flower

A dear friend of mine was lucky enough to have this thoughtful dessert display created especially for her...while she was on holiday in Greece, no less!

Just shows you how simple ingredients can be arranged in a supremely unique way.

Honor yourself with pretty things.

Carrot (Pulp) Cake - Recipe

We love to juice!
Anyone that has juiced carrots knows that you end up with a humongous amount of pulp/fiber.

We didn't want to through away it's goodness so I hunted for some easy recipes to utilize it.
I found one for a raw carrot cake type thing...it was amazing!

A bit more like pumpkin pie and completely decadent.
Throw all ingredients in a food processor and press in a pan.
See the link below for the forum that had the recipe we use.

After a bit in the fridge...
this is what you end up with!
Yes, that is raw carrot pulp!

(Forum post #1 by sunshineandstars )
We added a vegan (un) cream cheese frosting...recipe also found online.

Enjoy!

Tuesday, July 13, 2010

Juice Recipe - Valentine's Fruit Punch

A happy accident...

Last Valentine's Day Steve whipped up this random juice.
We simply used what felt good and what we had in the fridge.

The result tasted like sweet fruit punch and was very pretty.
The perfect color for Valentine's Day.

This recipe makes a lot...
about 4 large glasses to share!

Valentine's Fruit Punch
1-2 heads of romaine lettuce
1 lemon
3 red beets
5 or 6 apples
1 pear
1 inch of ginger
half a cabbage (we used napa)
half a cantaloupe

wash well and then run all through a juicer...

Pour and enjoy!

Let me know what you think.

Monday, July 12, 2010

Sun Butter Cups - Recipe


OMG!

These were so good!

I waited to post this recipe until I had made it a few times...
thinking it was a fluke that they tasted so good.
No way could these be "safe" for us.

They were actually better each time!

This is our altered recipe, due to our food allergies.
Try it...see what you think.
They are super easy and can be ready for a party or special event in a short amount of time.

We have plans to try different fillings...
Raw caramel? Mint? Berries?

Sun Butter Cups

This recipe looks long but it is so easy!
Once you do it once you might not even need to look at this again.

1 to 1 1/2 cups of sunflower seed butter
1/3 cup organic powdered sugar
2 to 2 1/2 cups vegan chocolate chips
1/4 teaspoon sea salt
10-14 paper or tin muffin cups

Melt about 1 1/4 cups of the vegan chocolate chips...90 seconds - 2 minutes on half power in the microwave or use a pot on the stove top. Stir. Be sure not to burn the chocolate.

Using the back of a spoon, press a thin layer of chocolate into the muffin cups... along the bottom and into the groves of the sides, stopping about half way up. If you want taller cups bring the chocolate higher up the sides. We preferred a thinner layer of chocolate to a thick one.

Don't expect them to be "perfect"...have fun, get messy.
They will taste good and some of the rouge chocolate will break away later, when you remove the muffin cups.

I placed my muffin cups on a cookie sheet or platter for easy transport in and out of the freezer or fridge.
Place the chocolate muffin cups into the freezer or fridge to harden.

In a bowl mix the sunflower seed butter and salt.
Fold in the the powdered sugar, breaking up the clumps as you go.

Make sure the chocolate cups have hardened. If they have, move on to the next step...
Warm the sun butter filling in a pot on the stove or in the microwave for about a minute. Let the filling sit for a minute.

Spoon the sun butter filling into the hardened chocolate cups, leaving room for the top layer of chocolate.
Place the filled cups back into the freezer or fridge while you prepare the rest of the melted chocolate.

Repeat what you did in step 1...melting the remaining chocolate.
Spoon the melted chocolate over the filled cups, gently working the melted chocolate into all edges.

Place the completed cups back in the freezer or fridge and wait (if you can) for them to set and harden.
Once set, peel the muffin cups off and enjoy!

After, I stored mine in the refrigerator and they kept for several days.
We couldn't tell for exactly how long because everyone ate them!

Thursday, June 24, 2010

Semi Raw Vegan Homemade Brownies

Treats we make to share with friends...
no wheat, no eggs, no dairy, no peanuts.
They always get a big "thumbs up"!

I think this is a great recipe to start out with...
tastes amazing and begins introducing you to the wonderful world of "raw foods".
I can't remember which books
some of this came out of..
so I apologize that I can't give an accurate reference.

Vegan Black and White Brownies:
* 2 cups pecans (or any nuts you like)
* 2 cups dates pitted and soaked in water for 5-10 min.
* 2/3 cup raw cacao powder (available at Whole Foods or health foods stores)
* 2 tsp vanilla extract
* pinch of sea salt

Blend dates in a food processor or high speed blender till a paste.

Separately grind nuts in a blender or chopper. Mix all ingredients in a bowl with your hands and press in a glass pan. Refrigerate for at least 10 minutes to set up.

When set, cut into squares, remove from pan and place on a platter, top with the frosting below and drizzle with the chocolate syrup below.

The chocolate syrup turns into a shell when refrigerated! yum

Frosting:

“Pamela’s Products” Vanilla Frosting Mix (available at natural food stores or Whole Foods)
I use Earth Balance in place of the butter to eliminate the dairy.
Just follow the package directions.

Chocolate Sauce:

½ cup Raw Cacao Powder (available at Whole Foods or health foods stores)
¼ cup Coconut Oil
¼ cup Agave syrup
mix by hand in a small bowl till smooth
* great on any dessert!

* Note: I did non create these individual recipes
but I did combine them to make these yummy treats.